Displaying a Custom View from SuiteCRM 7 in SuiteCRM 8
I wanted to share how to display a custom view from SuiteCRM 7 in the SuiteCRM 8 system. I referenced an article (and video) - SuiteCRM Developer Insights - Module Record Actions - SuiteCRM along with the code for ‘convertlead’ action from the legacy ‘Leads’ module to guide me through the process. Below are the steps I followed to successfully display a custom view:
-
The first step is to copy the
detailviewdefs.phpfile from themodules/Accounts/metadata/directory to thecustom/modules/Accounts/metadata/directory. This ensures that any changes you make are upgrade-safe.
After copying, add a new recordActions section in this file. You can define this action as follows:File path:
custom/modules/Accounts/metadata/detailviewdefs.php
'recordActions' => [
          'actions' => [
              'print-as-pdf' => [
                  'key' => 'print-as-pdf',
                  'labelKey' => 'LBL_PRINT_AS_PDF',
                  'asyncProcess' => true,
                  'modes' => ['detail'],
                  'acl' => ['view'],
                  'aclModule' => 'AOS_PDF_Templates',
                  'params' => [
                      'selectModal' => [
                          'module' => 'AOS_PDF_Templates'
                      ]
                  ]
              ],
              'hello-world' => [
				  'key' => 'hello-world',
                  'labelKey' => 'LBL_HELLO_WORLD',
                  'asyncProcess' => true,
                  'modes' => ['detail','edit'],
			  ],

          ]
      ],
-
To ensure that the custom button displays properly, you need to add a label for it in the language file. Create or update the following file if it doesn’t already exist:
File Path:
custom/Extension/modules/Accounts/Ext/Language/en_us.lang.php
<?php
$mod_strings['LBL_HELLO_WORLD'] = 'Hello World';
-
Run Quick Repair & Rebuild , then execute the following command from root directory to clear the cache:
php bin/console cache:clear
-
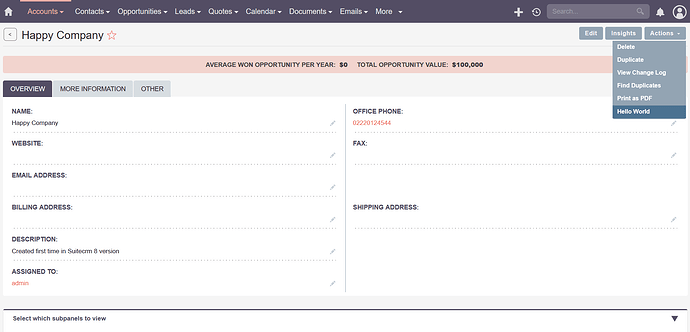
Refresh the detailview page of an accounts. We should see a new button in the list as follows.
- Add a new action view map by creating a file at the following path:
custom/Extension/modules/Accounts/Ext/ActionViewMap/hello_world.php, and include the following code.
<?php
$action_view_map['hello-world'] = 'helloworld';
- Create a new custom view by adding a file at the following path:
custom/modules/Accounts/views/view.helloworld.php, and include the following content.
<?php

require_once('include/MVC/View/SugarView.php');
class CustomAccountsViewHelloworld extends SugarView{

	public function __construct(){
		parent::__construct();
	}
	public function display(){
		echo 'Hello world';
	}
}
- Create a new
RecordActionby adding a file at the following path:
extensions/defaultExt/modules/Accounts/Process/Service/RecordActions/HelloWorldAction.php, and include the following content.
<?php

namespace App\Extension\defaultExt\modules\Accounts\Process\Service\RecordActions;

use ApiPlatform\Exception\InvalidArgumentException;
use App\Module\Service\ModuleNameMapperInterface;
use App\Engine\LegacyHandler\LegacyHandler;
use App\Process\Entity\Process;
use App\Process\Service\ProcessHandlerInterface;

class HelloWorldAction extends LegacyHandler implements ProcessHandlerInterface
{
	protected const MSG_OPTIONS_NOT_FOUND = 'Process options are not defined';
    protected const MSG_INVALID_TYPE = 'Invalid type';
    public const PROCESS_TYPE = 'record-hello-world';

	private $moduleNameMapper;

	public function __construct(ModuleNameMapperInterface $moduleNameMapper)
    {
        $this->moduleNameMapper = $moduleNameMapper;
    }

	public function getProcessType(): string
	{
        return self::PROCESS_TYPE;
    }

	public function getHandlerKey(): string{
		return $this->getProcessType();
	}

    public function configure(Process $process): void
    {
        $process->setId(self::PROCESS_TYPE);
        $process->setAsync(false);
    }

    public function requiredAuthRole(): string
    {
        return 'ROLE_USER';
    }

    public function getRequiredACLs(Process $process): array
    {
        $options = $process->getOptions();
        $module = $options['module'] ?? '';
        $id = $options['id'] ?? '';

        return [
            $module => [
                [
                    'action' => 'view',
                    'record' => $id
                ],
            ],
        ];
    }

   public function validate(Process $process): void
    {

       if (empty($process->getOptions())) {
            throw new InvalidArgumentException(self::MSG_OPTIONS_NOT_FOUND);
       }

        $options = $process->getOptions();

        if (empty($options['module']) || empty($options['action'])) {
            throw new InvalidArgumentException(self::MSG_OPTIONS_NOT_FOUND);
        }

        if (empty($options['id'])) {
            throw new InvalidArgumentException(self::MSG_OPTIONS_NOT_FOUND);
        }
    }

    public function run(Process $process)
    {
       $options = $process->getOptions();
        ['id' => $accountId] = $options;

        $responseData = [
            'handler' => 'redirect',
            'params' => [
                'route' =>$options['module'] . '/hello-world/' .$accountId,
                'queryParams' => [
                ]
            ]
        ];

        $process->setStatus('success');
        $process->setMessages([]);
        $process->setData($responseData);
    }
}
- Run Quick Repair & Rebuild , then visit the page by clicking the “Hello World” button.
Please Note: This is a very simple solution, there is a lot of potential to improve this solution

