How to Install SuiteCRM 8 on Fedora

I have successfully installed SuiteCRM 8.1.2 on Fedora 35. These instructions should work similarly on later versions. This worked in my particular environment; yours may differ.

This assumes you have a server with Fedora already installed, and you have full access to it. Run all commands as root or using sudo.

  1. Configure a database. I’ll use MariaDB on the same server in this example, but of course you can do things differently.
  • dnf install mariadb-server mariadb
  • systemctl enable --now mariadb.service
  • mysql_secure_installation
  • (replace put-database-name-here, put-username-here and put-password-here!)
echo "
CREATE DATABASE put-database-name-here;
CREATE USER put-username-here@localhost IDENTIFIED BY 'put-password-here';
GRANT SELECT, INSERT, UPDATE, DELETE, CREATE, INDEX, DROP, ALTER, CREATE TEMPORARY TABLES, LOCK TABLES
ON put-database-name-here.* TO 'put-username-here'@'localhost';
" | mysql
  1. Configure PHP. The stock PHP packages provided with Fedora do not have IMAP support, so I use the Remi repository. As of this writing, SuiteCRM has some issues running under PHP 8, so I use PHP 7.
  • dnf install https://rpms.remirepo.net/fedora/remi-release-$(rpm -E %fedora).rpm
  • dnf module reset php -y
  • dnf module install php:remi-7.4
  • dnf install ImageMagick pcre php-fpm php-gd php-imap php-intl php-mbstring php-mysqlnd php-pear-Net-Curl php-pecl-zip php-soap php-xml
  1. Configure a web server. I’ll use Apache HTTP Server in this example.
  • dnf install httpd mod_ssl php memcached
  • firewall-cmd --zone=public --add-service=http --permanent
  • firewall-cmd --zone=public --add-service=https --permanent
  • firewall-cmd --reload
  • setsebool -P httpd_can_network_memcache 1
  • systemctl enable --now httpd.service php-fpm.service memcached.service
  1. Choose the website to run SuiteCRM. I recommend a separate website (a subdomain). If you want to run it securely, get an SSL certificate for it (Let’s Encrypt is a great way to do so). Create a basic configuration for it (the SuiteCRM documentation gives examples). Here’s an example (replace the website name and document root path):
    <VirtualHost *:80>
        ServerName subdomain.example.com
        RewriteEngine on
        RewriteCond %{SERVER_NAME} =subdomain.example.com
        RewriteRule ^ https://%{SERVER_NAME}%{REQUEST_URI} [END,NE,R=permanent]
    </VirtualHost>
    
    <VirtualHost *:443>
        SSLEngine on
        RewriteEngine on
        ServerName subdomain.example.com
        DocumentRoot /PATH/TO/DEPLOYMENT/public

        # Remove extra slashes at start of URL
        RewriteCond %{THE_REQUEST} //+
        RewriteRule (.*) $1 [R,L]

        <Directory /PATH/TO/DEPLOYMENT/public>
            AllowOverride All
            Options FollowSymLinks
            Require all granted
            DirectoryIndex index.html index.php
        </Directory>

        # Add SSL certificate information here

    </VirtualHost>
  1. Download the latest version ZIP archive from Download - SuiteCRM and unzip it into /PATH/TO/DEPLOYMENT.

  2. From that directory, update permissions:

  • find . -type f -exec chmod 0644 {} ;
  • find . -type d -exec chmod 2755 {} ;
  • chmod a+x bin/console
  • chown -R root:apache .
  • chown -R apache:apache cache logs public
  • chmod -R g+w public/legacy/modules
  • find cache logs public -type f -exec chmod 0664 {} ;
  • find cache logs public -type d -exec chmod 2775 {} ;
  1. If your deployment is not in the standard location, you will need additional SELinux configuration (it should be possible to narrow this down more, but it’s nontrivial):
  • semanage fcontext -a -t httpd_sys_rw_content_t “/PATH/TO/DEPLOYMENT(/.*)?”
  1. Make the configuration take effect:
  • restorecon -R -v /PATH/TO/DEPLOYMENT
  • systemctl reload httpd
  1. Configure SuiteCRM. Go to your new site (https://subdomain.example.com/) and follow the prompts. Use “localhost” as the database server and leave port blank. You may need to press Proceed more than once. If you have problems, check SELinux denials, the Apache logs, the PHP-FPM logs, and /PATH/TO/DEPLOYMENT/logs/install.log, and see the SuiteCRM install documentation.

  2. Configure SuiteCRM settings. Log in to the site as the admin user you created in the previous step. Choose the Admin menu item, and under Email Settings, configure your email server (if you’re using postfix locally, you can use “localhost” and port 25 with no authentication), then select the button to send a test.

  3. Schedule the SuiteCRM scheduler job.

  • Edit /PATH/TO/DEPLOYMENT/public/legacy/config.php and change “allowed_cron_users” to contain “apache”.
  • While you can install a cron daemon and run a cron job, Fedora uses systemd timers natively, which work fine (this sets it to run every minute, you can use whatever schedule you prefer):
    cat >/etc/systemd/system/suitecrm.service <<EOF
    [Unit]
    Description=Run SuiteCRM Scheduler
    After=php-fpm.service
    Wants=suitecrm.timer

    [Service]
    Type=oneshot
    ExecStart=php -f /PATH/TO/DEPLOYMENT/public/legacy/cron.php
    User=apache
    Group=apache

    [Install]
    WantedBy=multi-user.target
    EOF
    cat >/etc/systemd/system/suitecrm.timer <<EOF
    [Unit]
    Description=Run SuiteCRM Scheduler Every Minute
    Requires=suitecrm.service

    [Timer]
    Unit=suitecrm.service
    OnCalendar=*:0/1

    [Install]
    WantedBy=timers.target
    EOF
    systemctl enable --now suitecrm.timer

You’re on your own now. :slight_smile:

2 Likes

Great installation guide, thanks :+1:

[I made a couple of cosmetic edits, adding the triple-backtick delimiters for code/config blocks.]

I don’t what the default values are these days, but you might want to tweak some php.ini settings, e.g.

error_reporting = E_ALL & ~E_DEPRECATED & ~E_STRICT & ~E_NOTICE & ~E_WARNING
memory_limit = 512M
max_execution_time = 300
upload_max_filesize = 100M
post_max_size = 100M

Those final two are meant just for the upgrade packages.

Enabling opcache will have a noticeable effect on performance, recommended for production, see here.

1 Like

Thank you for this tutorial. I am in the process of trying it and got stuck multiple times. Am a complete newby here. Here are the things I think are relevant info that would be helpful, had it been mentioned:

  1. Configure a root password for your mysql database (mariaDB)

    mysql_secure_installation

    → while the dialogue said I do not need to, as a matter of fact, for me it indeed was necessary to create a root password, otherwise it is possible to get stuck in the next step.

  2. Login to mysql was missing in step 1 of your tutorial:

    use following command right after mysql_secure_installation:

        mysql -u root -p  
    

    → then enter your root password to login into the mysql database. Somehow MariaDB seems to use mysql as backend or something? Anyway…

    the following commands will only work in a logged in state:

    	CREATE DATABASE put-database-name-here;
    	CREATE USER put-username-here@localhost IDENTIFIED BY 'put-password-here';
    	GRANT SELECT, INSERT, UPDATE, DELETE, CREATE, INDEX, DROP, ALTER, CREATE TEMPORARY TABLES, LOCK TABLES
    	ON put-database-name-here.* TO 'put-username-here'@'localhost';
    

    and btw.

    • the echo " and " | mysql are not part of the above command chain!
    • the three commands have to be entered separately. Press enter after every ;, as ; denotes the end of a command within the mysql database.
  3. After Step 3, but before Step 4 do the following (except for the last bullet-point, as it is covered by your step 4!):

    go to https://linuxconfig.org/configure-apache-virtualhost-on-fedora

    • start by creating a new directory which will contain the website’s files. Typically this is somewhere inside the /var/www directory.

        	$ sudo mkdir /var/www/example.net
      
    • Next, place your site files into the directory. Just as an example, we’ll create a simple index.html file for testing.
      After that, we need to give the directory proper permissions.

        	$ sudo echo Hello Web > /var/www/example.net/index.html
        	$ sudo chmod -R 755 /var/www/example.net
        	$ sudo chown -R apache.apache /var/www/example.net
      
    • Now we will need to edit the /etc/httpd/conf/httpd.conf file to configure a virtual host for our new website.
      You can use nano or your favorite text editor and open this file with root permissions.

        	$ sudo nano /etc/httpd/conf/httpd.conf
      
    • (This advise and last step is covered by step 4 in original post already, so probably can be left out, but may be of help to somebody)

      Add the following lines to the bottom of the file, of course replacing the example domain with that of your own.
      There are a lot more options you can put inside the virtual host directive, but these are the essential lines you’ll need.

        	<VirtualHost *:80>
       		 ServerName www.example.net
        	   ServerAlias example.net
        	   DocumentRoot /var/www/example.net
        	$ sudo Other Apache config directives, logs etc.
        	</VirtualHost>
      
  4. After Step 4, but before Step 5, do the following:

    Check for Syntax errors in configuration:

     sudo httpd -S
    

    Then:

     sudo systemctl restart httpd
    

    As long as your fully qualified domain name is already pointing to your server, everything should be good to go. Otherwise, for testing it is also handy to modify the /etc/hosts file. For example if this is done just locally, add the following line:

    sudo -i
    echo 127.0.0.1 www.example.net example.net >> /etc/hosts
    

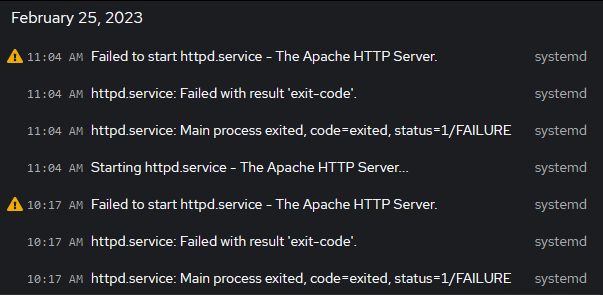
Right now I am stuck at the website deployment via using an Apache web server.

I am trying to follow Getting started with Apache HTTP Server :: Fedora Docs

As for where I am stuck exactly:

image

This is my adaption of your suggestion:

<VirtualHost *:80>
        ServerName tecrm.server.com
        RewriteEngine on
        RewriteCond %{tecrm.server.com} =tecrm.server.com
        RewriteRule ^ https://%{tecrm.server.com}%{REQUEST_URI} [END,NE,R=permanent]
    </VirtualHost>
 
    <VirtualHost *:443>
        SSLEngine on
        RewriteEngine on
        ServerName tecrm.server.com
        DocumentRoot /var/www/tecrm.server.com/public

        # Remove extra slashes at start of URL
        RewriteCond %{THE_REQUEST} //+
        RewriteRule (.*) $1 [R,L]

        <Directory /var/www/tecrm.server.com/public>
            AllowOverride All
            Options FollowSymLinks
            Require all granted
            DirectoryIndex index.html index.php
        </Directory>

        # Add SSL certificate information here

    </VirtualHost>

My device already has another hostname (server.public-biohof-ertel.de) apart from the virtual host tecrm.server.com though (back when I installed Fedora Server on this device, it asked me to add a name for the device)… and in the error log the only hostname that is mentioned is by following statement: _HOSTNAME server.public-biohof-ertel.de. The error logs never mention tecrm.server.com anywhere, … so I am not sure what’s going on.

Changing

VirtualHost *:80>
        ServerName tecrm.server.com

to

VirtualHost *:80>
        ServerName server.public-biohof-ertel.de

makes no difference. The service cannot be started.

Edit:

output of Sudo httpd -S:

VirtualHost configuration:
*:80                   server.public-biohof-ertel.de (/etc/httpd/conf/httpd.conf:360)
*:443                  is a NameVirtualHost
         default server server.public-biohof-ertel.de (/etc/httpd/conf.d/ssl.conf:56)
         port 443 namevhost server.public-biohof-ertel.de (/etc/httpd/conf.d/ssl.conf:56)
         port 443 namevhost server.public-biohof-ertel.de (/etc/httpd/conf/httpd.conf:367)
ServerRoot: "/etc/httpd"
Main DocumentRoot: "/var/www/html"
Main ErrorLog: "/etc/httpd/logs/error_log"
Mutex authdigest-client: using_defaults
Mutex lua-ivm-shm: using_defaults
Mutex ssl-stapling: using_defaults
Mutex proxy: using_defaults
Mutex authn-socache: using_defaults
Mutex ssl-cache: using_defaults
Mutex default: dir="/etc/httpd/run/" mechanism=default 
Mutex cache-socache: using_defaults
Mutex authdigest-opaque: using_defaults
Mutex watchdog-callback: using_defaults
Mutex proxy-balancer-shm: using_defaults
Mutex rewrite-map: using_defaults
Mutex ssl-stapling-refresh: using_defaults
PidFile: "/etc/httpd/run/httpd.pid"
Define: DUMP_VHOSTS
Define: DUMP_RUN_CFG
User: name="apache" id=48
Group: name="apache" id=48

I have the suspicion that the apache httpd service cannot start both virtual hosts at the same time? Some kind of conflicts? Also, when I tried to change this config for the first time, something immediately filled up my RAM almost completely. Only had 120 megabyte left xD A restart of my device luckily fixed it. RAM is normal again, but the process does not start.

The following snippet of the getting-started-with-apache-http-server docs might also be relevant here, but I am not sure:

As a best practice, do not modify /etc/httpd/conf/httpd.conf or any of the /etc/httpd/conf.d files shipped by Fedora packages directly. If you make any local changes to these files, then any changes to them in newer package versions will not be directly applied. Instead, a .rpmnew file will be created, and you will have to merge the changes manually.

It is recommended to create a new file in /etc/httpd/conf.d/ which will take precedence over the file you wish to modify, and edit the required settings. For instance, to change a setting specified in /etc/httpd/conf.d/foo.conf you could create the file /etc/httpd/conf.d/z-foo-local.conf, and place your setting in that file.

Help? :smiley:

Hi! It’s not clear from the initial example, but the only things that should be replaced in the example Apache config are subdomain.example.com and /PATH/TO/DEPLOYMENT. Everything else should be left literally as written, including SERVER_NAME.

/PATH/TO/DEPLOYMENT should be the directory you unzipped SuiteCRM in, so it should not be necessary to create the directory or site files at that point.

Hope that helps …

1 Like

Found another nitpick:

  • find . -type f -exec chmod 0644 {} ; → should instead be → find . -type f -exec chmod 0644 {} \;
  • find . -type d -exec chmod 2755 {} ; → should instead be → find . -type d -exec chmod 2755 {} \;
  • find cache logs public -type f -exec chmod 0664 {} ; → should instead be → find cache logs public -type f -exec chmod 0664 {} \;
  • find cache logs public -type d -exec chmod 2775 {} ; → should instead be → find cache logs public -type d -exec chmod 2775 {} \;

I guess the \; got lost because of incompatibilities with the Markdown format.

Source: 15 Super Useful Examples of Find Command in Linux

Using find and exec

Suppose you want to long list (ls -l) the search files with the find command. Here’s what you use:

find . -type f -name "*.txt" -exec ls -l {} +

Here’s the output:

abhishek@LHB:~/Examples$ find . -type f -name "*.txt" -exec ls -l {} +
-rw-rw-r-- 1 abhishek abhishek 39 Oct 13 19:30 ./another.txt
-rw-rw-r-- 1 abhishek abhishek 35 Oct 13 15:36 ./new/dir1/new.txt
-rw-rw-r-- 1 abhishek abhishek 35 Oct 13 15:36 ./new/dir2/another.txt
-rw-rw-r-- 1 abhishek abhishek 35 Oct 13 18:51 ./new/mystuff/new.txt
-rwxrwxrwx 1 abhishek abhishek 35 Oct 13 15:37 ./new/new.txt
-rw-rw-r-- 1 abhishek abhishek 35 Oct 13 18:16 ./new.txt

Many people forget to add the {} + at the end of the exec command. You must use it and mind the space between {} and +.

The {} is what references the result of the find command. You can imagine it to be like {file 1, file 2, file 3}. The + sign is used to terminate the exec command.

There is also another convention with exec:

find . -type f -name *.txt" -exec ls -l {} \;

Here, ; is used instead of the + sign. The additional \ before ; is used to escape the special character ;.

The advantage of {} + is that it runs fewer commands as ls -l file1 file2 file3 whereas {} \; will run ls -l file1, ls -l file2 etc.

But, {} \; has the advantage of using {} more than once in the same exec statement. For example, the command below will rename all the found files with .old extension.

find . -type f -name *.txt" -exec mv {} {}.old \;

Made some progress:

For now,

    <VirtualHost *:443>
        SSLEngine off

with off instead of on allowed me to restart the httpd service :slight_smile: Made sense, because I have not yet defined/enabled any encryption for this virtual host.

Another problem:

Could you please spell out following command: semanage fcontext -a -t httpd_sys_rw_content_t “/PATH/TO/DEPLOYMENT(/.*)?” ? I think it supposed to be something along semanage fcontext -a -t httpd_sys_rw_content_t “/PATH/TO/DEPLOYMENT\(/.*\)?”, but it still triggers a “non ascii” related error.

Edit:

Current problem I am stuck at:

“Go to your new site (https://subdomain.example.com/) and follow the prompts.”

Since this is a headless server I am working with, I cannot simply go to localhost.
Note for myself: Check out

I assume I also will have to open ports on my router and modify the firewall. Probably need to secure all this with the ssl certificate or something of the like, before I open the ports.

but this is for another day.

(Yep, the markdown ate my backslashes …)

Good point about SSLEngine, I should have mentioned an SSL certificate would be needed first. By the way, Let’s Encrypt offers them for free, so it’s worth the extra effort to get set up initially. If your site will be behind a firewall and only available locally, then turning off SSL could be fine, but if you plan on accessing it over the Internet I would definitely get one.

The semanage command worked as is for me – I didn’t have to escape any characters. It’s a regular expression matching the deployment directory itself, or anything below it.

If you ran the firewall-cmd commands, then you don’t need to be on localhost to view the website. You can view it in a browser from anywhere. Of course if you have a site firewall (besides the host itself) then you need to make sure it allows http/https to the server.

Note for myself: networking - Access to a site on localhost from remote - Stack Overflow

While i was still running into problems I talked to a friend of mine who is trained in IT and who advised me to set it up with docker. He thought I probably would have less problems with upgrading while keeping my operating system more secure as Suite CRM related processes will run within an isolated environment.

So eventually I managed to set it all up on Fedora using docker. Along the way, we ran into a few problems too. Especially ERROR ==> Could not connect to the database on *fresh install* · Issue #25390 · bitnami/containers · GitHub was a tough nut to crack, but found a workaround. It would be great, if somebody with more knowledge about docker could create a pull-request to fix the suite crm docker image provided by Bitnami.

Here is my current solution (I have not tried to make my suite CRM instance to be accessible from the internet yet):

# Guides I followed:

   #https://dexor.de/blog/suitecrm-in-docker/
   #https://github.com/bitnami/containers/tree/main/bitnami/suitecrm#readme

# HOW TO INSTALL
-----------------------------
#Start by installing Docker
#https://docs.docker.com/engine/install/fedora/

# Continue by installing suitecrm
#https://github.com/bitnami/containers/tree/main/bitnami/suitecrm#readme

   git clone https://github.com/bitnami/containers.git
   # cd bitnami/APP/VERSION/OPERATING-SYSTEM
   cd ~/USER/Suite-CRM-Docker-Setup/containers/bitnami/suitecrm

# Now, change the docker-compose.yml file to include correct environment variables parameter
   # Keep in mind that the path to volumes in mariaDB and suiteCRM should differ!
   # Docker will check during creation of suitecrm config, if path of volume is empty and errors out, if otherwise

   #Example for how it worked for me:

       volumes:
       # - 'mariadb_data:/bitnami/mariadb'
         - '/PATH/TO/PERSISTENCE:/bitnami/mariadb'

       volumes:
       # - 'suitecrm_data:/bitnami/suitecrm'
         - '/PATH/TO/PERSISTENCE/DIFFERENT/DIFFERENTTWO:/bitnami/suitecrm'

   # If the error still triggers, remove following 3 lines during inital setup
   # to create suitecrm or php config with non-persistence.
   # Afterwards add these 3 lines back and try to run the container again with persistence.

       volumes:
       # - 'suitecrm_data:/bitnami/suitecrm'
         - '/PATH/TO/PERSISTENCE/DIFFERENT/DIFFERENTTWO:/bitnami/suitecrm'


# follow https://sysctl-explorer.net/net/ipv4/ip_unprivileged_port_start/
# Add net.ipv4.ip_unprivileged_port_start=0 to /etc/sysctl.conf (or /etc/sysctl.d) by going to /etc/syscctl.d and open CLI

    sudo nano 99-sysctl.conf
    net.ipv4.ip_unprivileged_port_start=0
    sudo sysctl --system

# Run the docker container
   
   docker-compose up

# Open new second commandline in different folder (while docker-compose up is running in the first command line!)

    docker ps
    #copy the container ID
    docker exec -it PASTETHECONTAINERID /bin/bash


#Create MYSQL database config (only works if logged into docker via docker exec ...)

    mysql -u root -p
    # enter password from .yml file MARIADB_PASSWORD or MARIADB_ROOT_PASSWORD)

#Create database and grant rights

    CREATE DATABASE put-database-name-here;
    USER put-username-here@localhost IDENTIFIED BY 'put-password-here';
    SELECT, INSERT, UPDATE, DELETE, CREATE, INDEX, DROP, ALTER, CREATE TEMPORARY, TABLES, LOCK TABLES ON put-database-name-here.* TO 'put-username-here'@'localhost';


# still within mysql; Check which users are existing:

    select User, Host, Password from mysql.user;
    
    exit
    exit

#The container should now show up in "whaler" (https://github.com/whaler/whaler)
# Start the container again via "whaler" or use "docker-compose up" to run the container

   docker-compose up

# enter 127.0.0.1 in your webbrowser (e.g. Firefox)
    
    # Login via your username or alternatively via
      user: user
      password: bitnami

There were three major hurdles:

  1. persistent volumes for mariaDB and suitecrm should DIFFER. suitecrm config is created AFTER mariaDB and apparently checks if PATH/TO/PERSISTENCE is empty, before trying to create the config. If not empty, no config will be created. At least that’s the hypothesis we have for why the php error was triggered.
  2. I was not able to access the standard port, because my docker is configured to not run as root, hence had to give privileges first.
  3. The mysql database was supposed to be created automatically during initial setup, but it was not, so we had to create it manually from scratch.

Greetings,

ThiloteE